1 – Ensure you have all the required equipment and PPE.
Below is a list of all the equipment and PPE you will need to map an underground level safely and efficiently. Having all of these is vital.
| Equipment & Materials | Information |
| Paint & Paint Pole | For marking up backs. |
| Measuring Tape | For measuring 5m marks on wall. |
| Distometer | For measuring distance from survey stations. |
| Torch | For viewing backs and face. |
| Compass | For taking structural measurements. |
| Mapping folder, Scale ruler, blank backs map sheets, pens, and pencils | For creating backs maps. |
| Hoses | For washing backs prior to mapping. |
| Scaling Bar | For scaling down walls and face prior to mapping. |
| Pre-start vehicle checks | To complete and document. |
| Current shift sheet | For a list of UG Activities. |
| PPE | ||
| Safety Glasses | Hard Hat | Steel Capped Boots |
| Gloves | Hearing Protection | Hi-Visibility Clothing |
| Self-Rescuer | Mining Belt | Cap Lamp |
| Watch | ||
2 – Prepare the area.
Preparing the mapping area is important to ensure that you are mapping safely and efficiently and completing a good quality map. There are many steps that are involved and are outlined below:
- Go to pre-shift meeting and ensure mapping area is available and safe to work in for a 2-5hr period during the day.
- Get to the mapping area and complete a hazard analysis. Ensure area is safe to work in.
- Start by washing down at the beginning of the mapping area, walk down the middle of the drive (staying away from the walls) and wash the walls on the way in and then wash the backs on the way back out. Ensure adequate coverage of water and that all dust has been washed off, often starting at the top of the wall, and working your way down is the best option.
- After the area is washed it is now a good idea to get your scaling bar and scale off any loose material, starting on one wall walk down the drive and the come back via the other side.
3 – Ensure accurate mark up of geolines.
Having accurate geolines on your map is necessary to ensure you have the most accurate map you can and while this step can be skipped if in a hurry, if you have the time to get the geo lines picked up by a surveyor before creating your map you will have a more accurate map.
- Using a paint pole paint up all of the major geological features including any lithology / intrusives changes, faults and ore zones. You will probably already have a colour code for what colours you should be using.
- Black or white paint can be used to cross out any errors pending the colour of the host rock.
- Find a survey station and mark up 5m intervals on the wall in a different colour to what you have already used. These marks will be used whilst mapping to ensure you have an accurate map. In areas of high geological complexity, you can even reduce these intervals to 2m.
- After all of the geolines have been marked up call a surveyor to come and pick the lines up and put them onto your 3D modelling software.
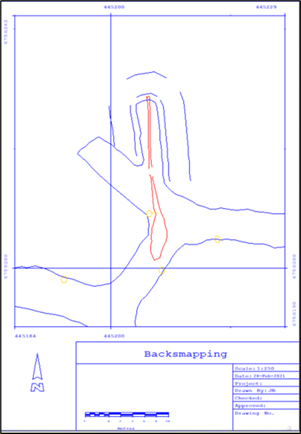
4 – Create an accurate mapping template.
Having an accurate geological map of an underground drive is very important. The map can be used to delineate the ore model on your computer which is in turn very important for stoping (the end result of underground mining). An accurate geological map can reduce dilution and maximise ore extraction from the level.
See blue lines for level asbuilt (including wall strings layed out for mapping), yellow for survey stations and red for geolines (ore).
- Plot the level map onto an A4 piece of paper including level asbuilts, geolines and survey stations.
- Ensure the map is printed to scale (1:250 is the best), and includes a scale bar, north arrow and details about the area, date and who is mapping the level.
5 – Ensure an accurate map underground.
- Print off your map and take it back underground.
- It is important to conduct another hazard assessment just to make sure the ground conditions haven’t changed since you were there earlier.
- Measure out the 5m metre marks onto your map if these were not picked up.
- You map should now contain the basic outline of the geological features and boundaries for your level. What you need to do now is annotate and draw on all of lithology boundaries, alteration boundaries, mineralisation boundaries and any structural information.
- Your geolines should already have the main boundaries but be sure to include a higher level of detail on your map such as sulphide %, structural measurements, bedding, jointing, veining %, alteration style etc.
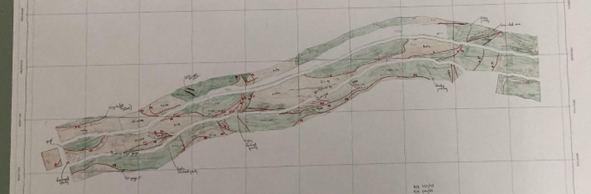
6 – Transfer mapping to A0/A1 map.
Now that you have completed your draft copy underground which is often very dirty and has water drops on it etc. it is important to transfer this copy over to a large overall level plan. These are often created level by level are an integral part of underground mining.
- Using a light table transfer your A4 map over to the A0/A1 level map.
- This copy should be kept neat and tidy, ensure you copy over all of the details from your underground map, using proper geology codes and symbols.
- Colour in you map with coloured pencils according to your appropriate colour scheme.
- You may even like to infer structures across the level plan and drives to give an overall picture of what is happening underground.
- See below for a finalised underground map.